Firmware Update for the Weather Station

Now the weather station is a weather forecast display.

Knowing the highest temperature I’ve seen today isn’t the best use of the hi temp needle. I was there, I remember how hot it got. It’s more useful to see the forecast high temp.

There’s new firmware here https://github.com/powerfulmojo/WeatherMojo/blob/master/forecastmojo.ino

The old firmware still works the same. The new one:

  • Displays forecast high temp on the thin hand

  • Updates forecast high once daily at 4am

  • Adjusts all hands at once instead of one at a time

  • Uses http://weatherbit.io/ instead of OpenWeatherMap

  • Retrieves dew point directly instead of computing it

  • API keys moved to .gitignored a header file so I’m not uploadin’ ‘em to github

  • Better Particle.function() calls to control motors

  • Avoids blocking on long motor moves

It still looks great.

The duck is impressed

The duck is impressed

WiFi Weather Station

I have a weather station problem. Well, a series of problems, really. I think I’ve had 3 of them over the past several years, but they all suffer from one or more problems.

  • They don’t tell me Dew Point
    Relative humidity is inferior and I’ll fight anyone who says otherwise.

  • They lose connectivity to their sensors
    I don’t need hyper-local data. I just want to know the temperature in my neighborhood, not literally in my yard. There’s no reason to deal with this.

  • They eat batteries
    The outdoor temperature sensor in particular seems like it’s always crying for a new battery.

  • They’re ugly
    Who wants THIS on their wall??

If I build my own, I can fix this. My aesthetic is mid-century modern IoT. I think it’s funny to make an internet-connected weather station and then put it in a retro-looking container with analog gauges.

The Architecture

Processor

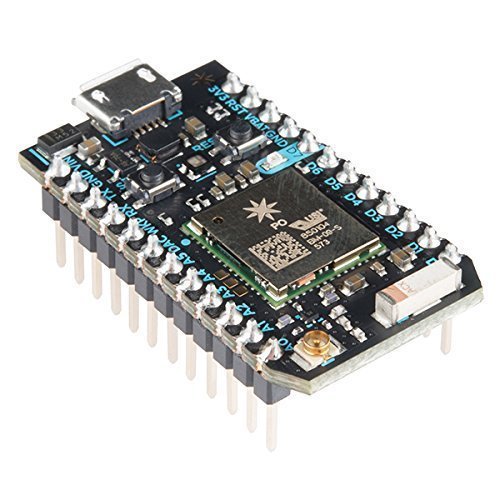
I have a Particle Photon that’s not assigned to anything at the moment. It’s cheap, wi-fi enabled, powered directly by USB, and you can flash new software to it over the web. It’s actually really powerful and at $19, it’s not even the most expensive thing in the build.

Gauges

For the all-important dew point, I’m using a Juken X27.168 Stepper Motor. It has internal stops at each end of a 315° rotation, so it’s easy to find its zero position at start-up.

I want to display temperature and daily high temperature on one scale. To do that, I need a Juken X40 879B dual-spindle stepper motor.

They’re very low torque, but they can be driven at USB voltages, so it keeps the power situation simple.

Cabinet

I need a nice looking container to put the whole thing in. I like the look of this clock. It’s more than 8 inches across, so there should be plenty of room for everything inside.

I’m replacing the face, but I’ll reuse a couple of the hands.


Building It

Software

The Photon has plenty of memory for an HTTP Client, a JSON parser, and a library to drive stepper motors. Everything can be globally scoped and reused as long as the thing is powered on.

The first free weather API I found is OpenWeatherMap. It doesn’t have dew point explicitly, but as everyone knows:

 
(T,RH)
Tdp = ⎼⎼⎼⎼⎼⎼⎼⎼⎼⎼⎼⎼
       b - γ(T,RH)
  where
         ln(RH/100) + bT
γ(T,RH) = ⎼⎼⎼⎼⎼⎼⎼⎼⎼⎼⎼⎼⎼⎼⎼⎼⎼
             C + T   
  and
b = 17.67, C = 243.5, 
T = temp (°C),
RH = relative humidity
 

So computing dew point and stepper motor positions is just a little algebra. I passed Algebra last century, and I still remember a lot of it.

The firmware is at https://github.com/powerfulmojo/WeatherMojo.

Particle variables and functions are documented here.

Electronics

The X27.168 and the X40.879B are driven by L293D dual H-bridges. They’re about 80¢ each when you buy 10. They have built-in flyback diodes to protect the Photon from any inductive-load-related nastiness that comes back from the motors.

Here’s what the design looks like:

schematic

It’s a lot of wires, but it’s not very complicated. Each H-bridge has 4 power pins, 4 ground pins, 4 processor connections, and 4 motor connections. I was able to squeeze everything onto a 24x18 perfboard.

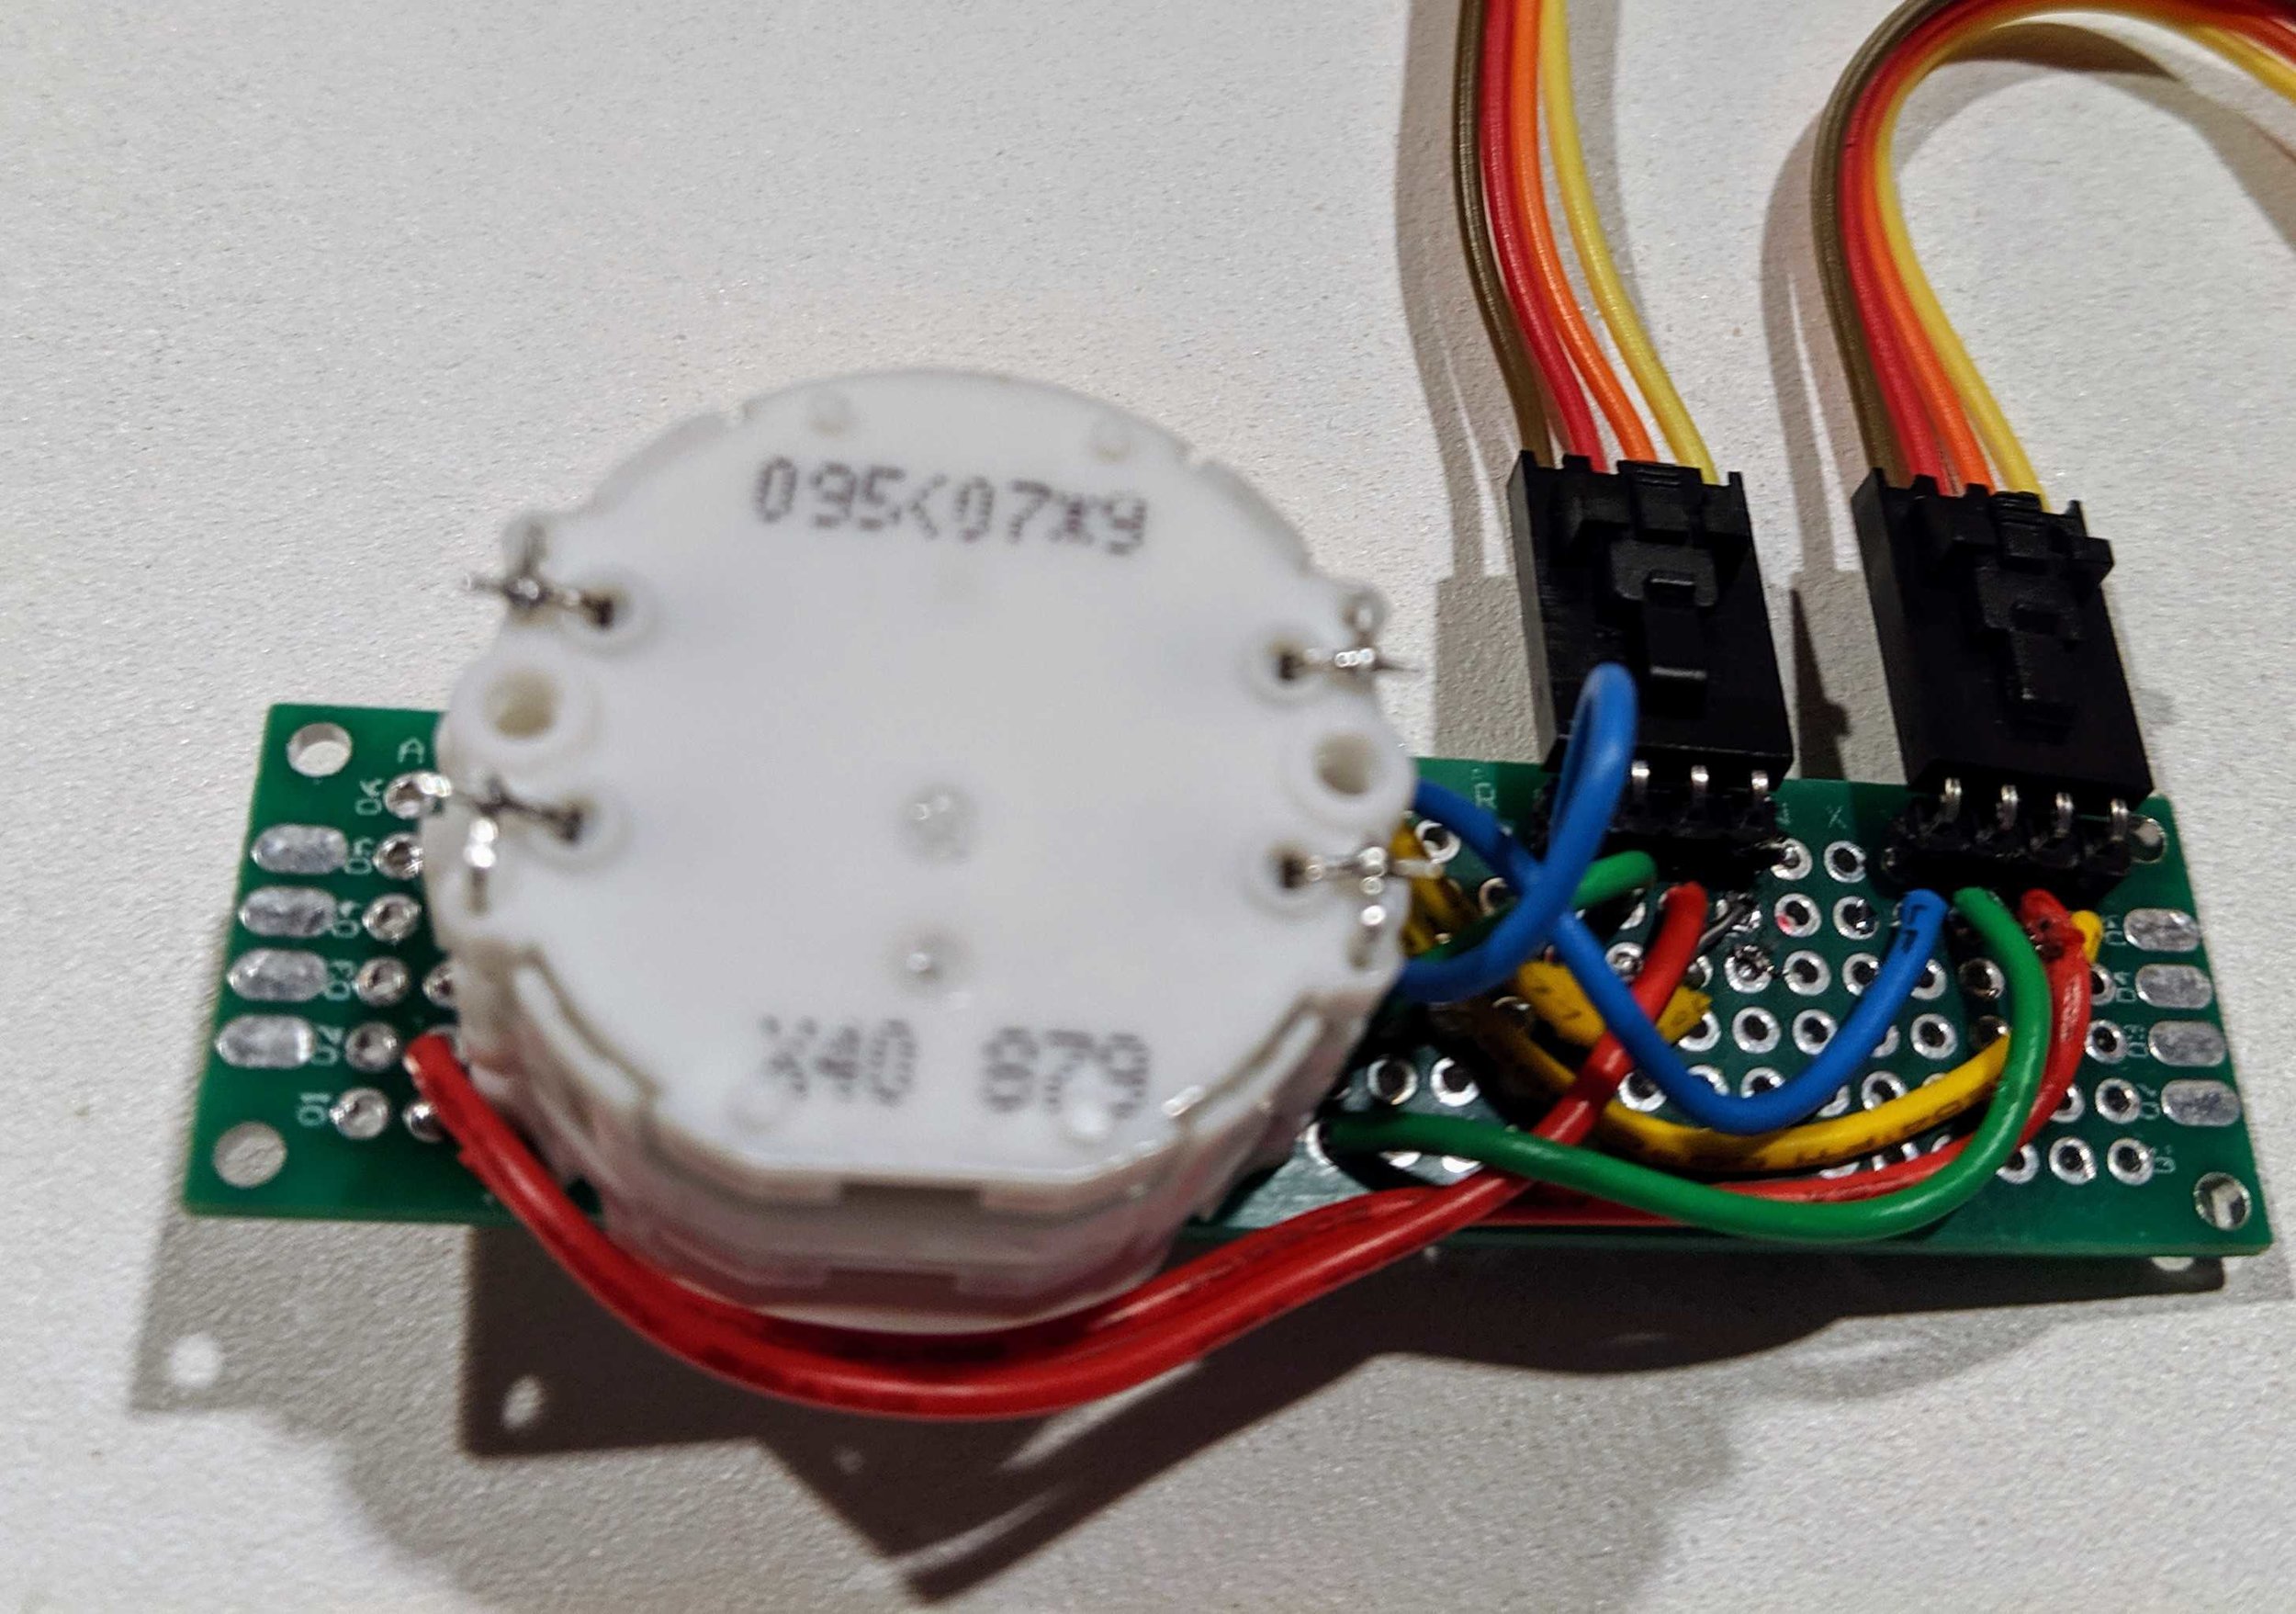
Since the X40 has front contacts, I soldered that to its own board and used right-angle headers to connect jumper wires to it.

x40Board.jpg

I had to fiddle with pin assignments to get the motors spinning in the right direction, but that’s all software. I did it after everything was soldered in place.

The Gauges

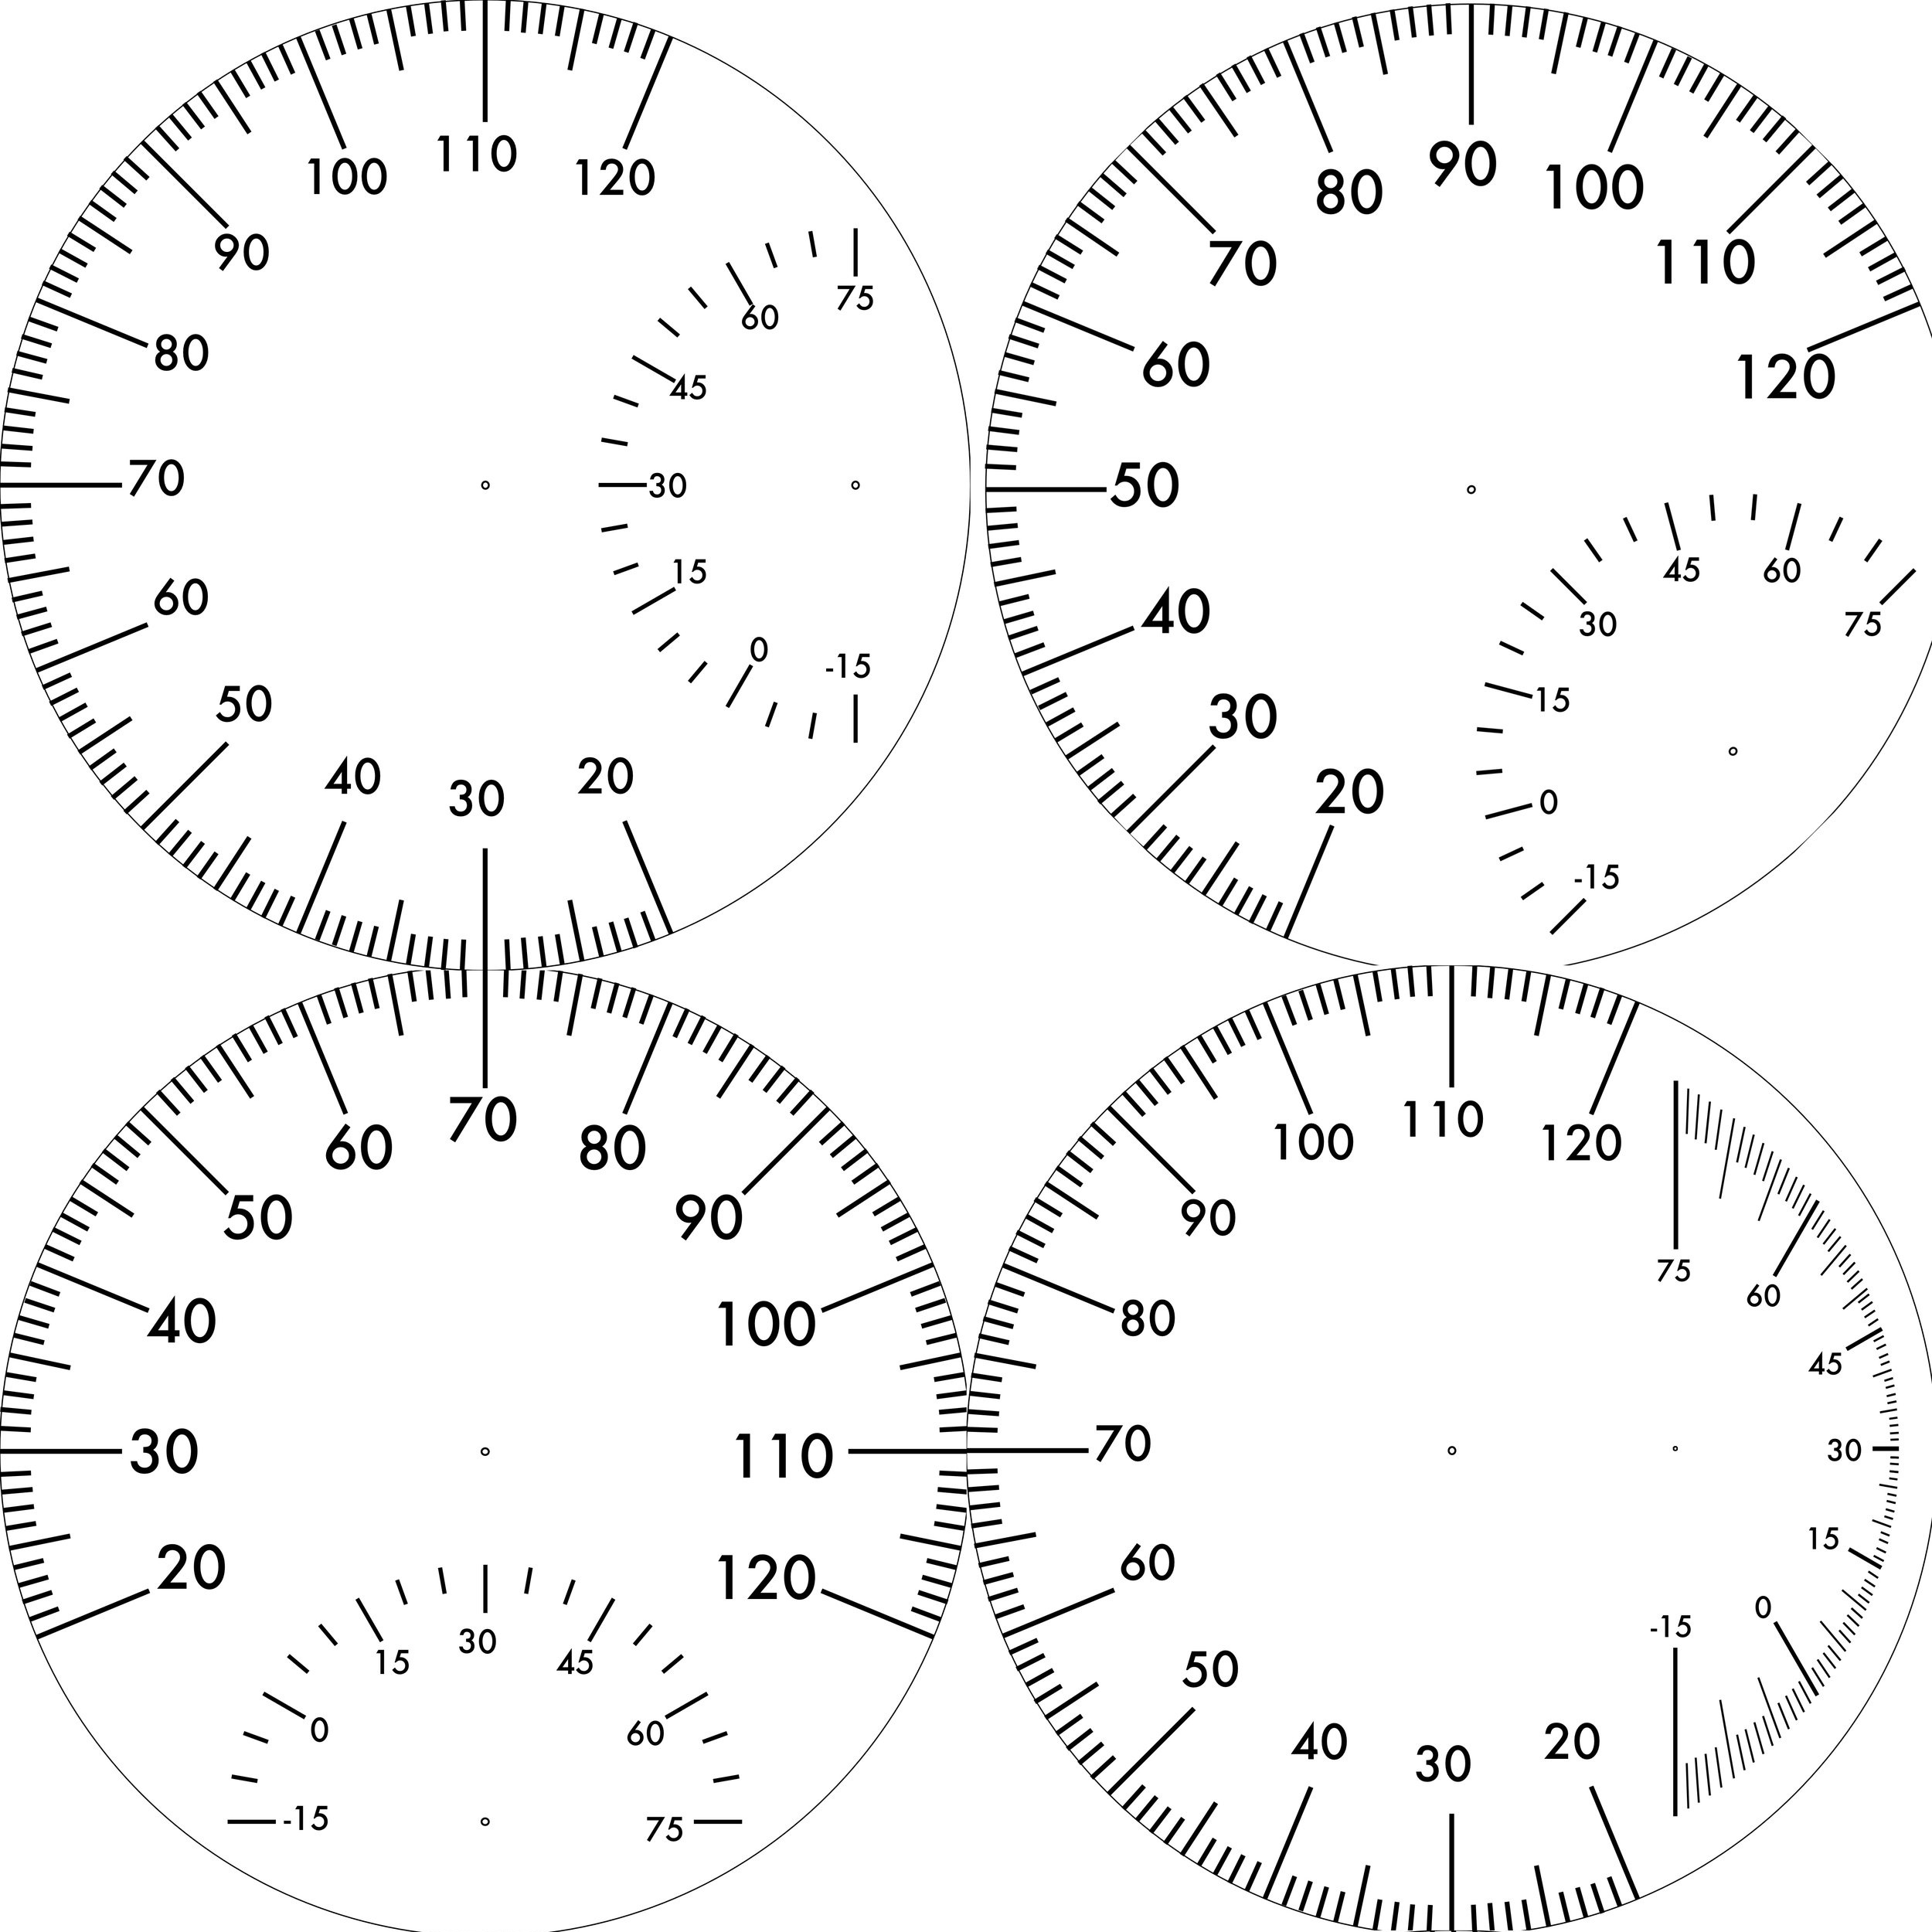
The face is a stainless steel disc I got from an eBay seller. I drew up some concept gauge layouts to see what I liked.

GaugeProofs.jpg

I printed the gauges on some water decal paper on my laser printer & applied it to the steel in one piece.

The hardest part of the project was actually attaching the gauge hands. The contacts on the temperature motors are on the front, so all of the connections have to be made between the motor body and the back side of the face. The spindles only stick out a few millimeters in the first place, so I spent a whole day driving back and forth to the hardware store trying out parts I might use to mount the hands to the motor.

If you try this, save the clock mechanism. It already has parts that fit the clock hands. That way you only have to adapt them to fit the motors.

The Finished Product

I love it! I probably ended up spending as much as I would on a decent weather station, but this one shows me data I actually care about.

Front

In Situ

Back

The big hand shows current temperature while the skinny one shows the highest temperature seen today. Most of the time they’re overlapping but as the temperature cools down, it shows you how hot it got today. It resets every morning at 9:00am so you still have a little time to see yesterday’s high at breakfast.

Win32::AmbientOrb

This page describes a Perl module I wrote to support a serial-port controlled Ambient Orb. See the Original Post for details. If you just want to get the package, you can download it directly or grab a PPD.

Manipulate an Ambient Orb through a serial port

NAME

Win32::AmbientOrb - Manipulate an Ambient Orb through a serial port

SYNOPSIS

  use Win32::AmbientOrb;

EXAMPLE

  use Win32::AmbientOrb qw(:ALL);

  my $port = "COM1:";
  Win32::AmbientOrb::Port($port); #set port to COM1
  InitializePort();               #set serial port settings
  PagerIgnore(1);                 #don't listen to the pager network

  # go straight to red
  my @red = (176, 0, 0);
  DirectColor(\@red);

  # quick transition from blue to red
  my @blue = (0, 0, 176);
  TransitionColor(\@blue, \@red, 20, 5);

  # slow transition from red to blue
  TransitionColor(\@red, \@blue, 50, 100);

  # clean up
  CloseOrb();

DESCRIPTION

The Win32::AmbientOrb module lets you manipulate an Ambient Orb connected to a Win32 machine through a serial port.

It uses Win32::SerialPort for serial port communication.

EXPORTED HASHES

Two hashes are exported by default, %OrbColor and %OrbRGB.

%OrbColor
Maps from color names to Color IDs useful for ColorAnim( ). Available color names are:

 • Red          => 0
 • LightRed     => 1
 • DarkOrange   => 2
 • Orange       => 3
 • LightOrange  => 4
 • DarkYellow   => 5
 • Yellow       => 6
 • LimeGreen    => 7
 • PaleGreen    => 8
 • GreenMinus3  => 9
 • GreenMinus2  => 10
 • GreenMinus1  => 11
 • Green        => 12
 • GreenPlus1   => 13
 • GreenPlus2   => 14
 • PaleAqua     => 15
 • Aqua         => 16
 • DarkAqua     => 17
 • Cyan         => 18
 • DarkCyan     => 19
 • LightBlue    => 20
 • SkyBlue      => 21
 • BlueMinus2   => 22
 • BlueMinus1   => 23
 • Blue         => 24
 • DeepBlue     => 25
 • VeryDeepBlue => 26
 • Violet       => 27
 • Purple       => 28
 • LightPurple  => 29
 • Magenta      => 30
 • MagentaPlus1 => 31
 • MagentaPlus2 => 32
 • MagentaPlus3 => 33
 • MagentaPlus4 => 34
 • MagentaPlus5 => 35
 • White        => 36
%OrbRGB
Contains the mapping of color ids to RGB arrays useful for DirectColor( ).

METHODS

Port( [$port] )
Sets or returns the port that the Ambient Orb is connected to. Default is COM1:

InitializePort( )
Initializes the serial port for communication with the Ambient Orb. Settings are:

 • BAUD: 19200
 • PARITY: N
 • DATA: 8
 • STOP: 1
ClosePort( )
Cleans up the port object.

ColorAnim( [$color], [$animation] )
Changes the color of the Orb using the default color and animation settings. Colors are listed above in %OrbColor Animations are 0-9

        ANIMATION
 • 0 almost imperceptibly slow
        ...
 • 7 very fast
 • 8 crescendo effect
 • 9 heartbeat effect
DirectColor( \@rgb )
Sets the orb instantly to the color specified in the 3-element array @rgb. Red, green and blue values should be between 0 and 176.

TransitionColor( \@rgb0, \@rgb1, $steps, $wait )
Performs a slow transition from the color in @rgb0 to the one in @rgb1. Sets the orb instantly to the color specified in the 3-element array @rgb0, then sends $steps updates, one update every $wait milliseconds until it reaches the color specified in @rgb1. Red, green and blue values should be between 0 and 176.

PagerIgnore( $ignore )
Instructs the orb not to listen to the pager network. If you don't call this, the orb will keep changing its color to reflect whatever channel it was listening to before you plugged in the serial port.

AUTHOR

Andy Allen

Orb Walkthrough

This page goes through how to set up your serial-controlled orb. The sections are: What You Will NeedConnecting the HardwareInstalling Perl and Required PackagesCreating a Color ScriptInstalling the ServiceWeb-Connected OrbsOther Uses For the Orb

You Will Need:

HARDWARE

SOFTWARE

  • Perl (I used ActiveState). I've included ppm commands below.
  • Aldo Calpini's Win32::API package ppm install Win32-API
  • Dave Roth's Win32::Daemon package ppm install http://roth.net/perl/packages/Win32-Daemon.ppd
  • Bill Birthisel's Win32::SerialPort package I didn't use a ppd, I installed it the old-fashioned way (as described in the README, but you could try finding a ppd with a Google search
  • Win32::AmbientOrbppm install http://powerfulmojo.com/tools/ppm/Win32-AmbientOrb.ppd
  • The service files in AmbientOrbService.zip

Connecting the Hardware

  • Plug the serial exension cable (if you're using one) into your serial port.
  • Plug the HDK into the serial extension cable
  • Plug the Orb into the HDK.
  • Plug the Power adapter (supplied with the Orb) into the HDK.

The orb will go through its regular power-up routine, then start displaying the DJIA channel (or whatever it was most recently tracking).

Installing Perl and Packages

Install Perl and get all of the packages above installed in the order listed. If you use the ppm commands provided, it will link the modules' documentation right into your html documentation so you can see how to use everything. You will only be using Win32::AmbientOrb directly. It depends on Win32::SerialPort (which depends on Win32::API), and we will need Win32::Daemon to get it up and running as a service.

Creating a color script

The service will need a script to tell it what color to turn the orb. A color script can be written in just about any language, it just has to print an integer to the console representing the correct color. Possible colors are:

0 Red 24 Blue
3 Orange 27 Violet
6 Yellow 30 Magenta
12 Green 35 Red-Magenta
18 Cyan 36 White

You can use any integer between 0 and 36. The ones I didn't list work out about like you'd expect (i.e. 9 is yellowish-green). My color script is in Perl and is available below. A blue orb means all builds are successful, a red orb means at least one build is failed, and a yellow orb means the CruiseControl server was unreachable.

Here is an example of a (very simple) batch file color script:

@echo 24

It's not very interesting, because it just returns the code for "blue." The default script looks like this:


 1   #!perl
 2   use strict;
 3   use LWP::Simple;
 4
 5   my $color = getColor();
 6   print $color;
 7
 8   sub getColor {
 9       my $color = 6;
 10      for (my $retry = 0; $retry < 3; $retry++) {
 11          if ($color == 6) {
 12              sleep 1 if ($retry > 0);
 13              $color = getColorRequest();
 14          }
 15      }
 16      return $color;
 17  }
 18
 19  sub getColorRequest  {
 20      my $color;
 21      my $dashboard = get('http://cchost/ccnet');
 22      if ($dashboard) {
 23          if ($dashboard =~ />Fail/) { $color = 0; }
 24          else { $color = 24; }
 25      }
 26      else {
 27          $color = 6;
 28      }
 29      return $color;
 30  }

It is a little more interesting: it makes a request to a server named cchost and searches the response for the word "Fail." If it finds it, at least one build is failed and the orb should be red. If no builds are failed, the orb should be blue. In the event that the server is unavailable, it will retry the request twice more, but if it still can't reach cchost it will turn the orb yellow.

Installing the Service

Now that the orb is hooked up and you've got your color script written, here's how to install the service to make it go.

Put the files in place

Create a folder named C:\Program Files\AmbientOrb and copy everything in this .zip into it: AmbientOrbService.zip. Put your color script in the same folder.

Install the Service

You will need the script installOrbService.pl (or one like it) to install the AmbientBuild Windows Service on your host.


 1   #!perl
 2   use strict;
 3   use LWP::Simple;
 4
 5   my $color = getColor();
 6   print $color;
 7
 8   sub getColor {
 9       my $color = 6;
 10      for (my $retry = 0; $retry < 3; $retry++) {
 11          if ($color == 6) {
 12              sleep 1 if ($retry > 0);
 13              $color = getColorRequest();
 14          }
 15      }
 16      return $color;
 17  }
 18
 19  sub getColorRequest  {
 20      my $color;
 21      my $dashboard = get('http://cchost/ccnet');
 22      if ($dashboard) {
 23          if ($dashboard =~ />Fail/) { $color = 0; }
 24          else { $color = 24; }
 25      }
 26      else {
 27          $color = 6;
 28      }
 29      return $color;
 30  }

You only need to run this script once to install the service. It takes one argument: -i for install or -u for uninstall, then prints a short status message indicating whether the action was successful.

Line 14 points to the script that will be started when the Windows Service starts. That's our orbService.pl script. If you write your own Windows Service, you would put its pathname here, using the short pathname (with no spaces). If you fill out a username and password in lines 12-13, the script will run as that account. If you leave it blank, it will run as System.

Note that line 14 should contain the orbService.pl script as written, not your color script.

Configure the Service

The service looks for a file named orbService.config, which can have any of the following values. If a value is not specified, it will use the default listed.

KEY

Default Value

Description

colorScript

C:\Program Files\AmbientOrb\ccnetWeb.pl

prints orb color code to STDOUT

webOrbs

[n/a]

serial #s of other orbs, comma-separated, no trailing comma

port

COM1

serial port to use

logFile

C:\Program Files\AmbientOrb\orb.log

verbosity

1

0 = silent, ..., 3 = garrulous

maxLogLines

10000

maximum lines to leave in log file

pollingInterval

30000

wait between updating the orb (ms)

sleepTime

2000

between processing service messages (ms)

waitForStop

20000

how long to expect service stop to take (ms)

errorColor

0

color to use on colorScript error (0-36)

errorAnim

5

animation on colorScript error (0-9)

While the service is running, changes to this configuration file will be automatically loaded the next time the script checks its messages (within 2 seconds by default). If you leave the service configured as shown, it will run the ccnetWeb.pl script every 30 seconds.

Web Orbs

In my environment, we have three orbs and only two HDKs. The service is installed on both hosts with HDKs attached, but that leaves one orb out of the loop. To update it, one of the servers is also configured to update the orb using its webOrbs configuration parameter. This orb is updated using Ambient's Web Developer API.

Other uses

This service was written to make it easy to monitor anything using an Ambient Orb. With a different color script and polling interval, you could make it monitor just about anything. During testing I had it monitor hockey scores, crude oil prices, and network traffic (not all at the same time). If you do something like that, I'd like to hear about it, so please let me know.

#!perl
###########################
# installOrbService.pl
###########################
use Win32::Daemon;
my $svcName = 'AmbientBuild';
%Hash = (
    name    =>  $svcName,
    display =>  $svcName,
    description => 'Ambient Build Monitor',
    path    =>  'c:\\perl\\bin\\perl.exe',
    user    =>  '',
    pwd     =>  '',
    parameters =>'c:\\Progra~1\\AmbientOrb\\orbService.pl',
);

my $action = $ARGV[0];
if (lc($action) eq '-i') {
    if( Win32::Daemon::CreateService( \%Hash ) ) {
        print "Successfully added.\n";
    }
    else {
        print "Failed to add service: ",
         Win32::FormatMessage(Win32::Daemon::GetLastError()),
         "\n";
    }
}
elsif (lc($action) eq '-u') {
    if( Win32::Daemon::DeleteService( "", $svcName ) ) {
        print "Successfully removed.\n";
    }
    else {
        print "Failed to remove service: ",
         Win32::FormatMessage(Win32::Daemon::GetLastError()),
         "\n";
    }
}
else {
    print "Unknown action ",
    "(use -i for install, -u for uninstall).\n";
}

You only need to run this script once to install the service. It takes one argument: -i for install or -u for uninstall, then prints a short status message indicating whether the action was successful.

Line 14 points to the script that will be started when the Windows Service starts. That's our orbService.pl script. If you write your own Windows Service, you would put its pathname here, using the short pathname (with no spaces). If you fill out a username and password in lines 12-13, the script will run as that account. If you leave it blank, it will run as System.

Note that line 14 should contain the orbService.pl script as written, not your color script.

Configure the Service

The service looks for a file named orbService.config, which can have any of the following values. If a value is not specified, it will use the default listed.

KEY

Default Value

Description

colorScript

C:\Program Files\AmbientOrb\ccnetWeb.pl

prints orb color code to STDOUT

webOrbs

[n/a]

serial #s of other orbs, comma-separated, no trailing comma

port

COM1

serial port to use

logFile

C:\Program Files\AmbientOrb\orb.log

verbosity

1

0 = silent, ..., 3 = garrulous

maxLogLines

10000

maximum lines to leave in log file

pollingInterval

30000

wait between updating the orb (ms)

sleepTime

2000

between processing service messages (ms)

waitForStop

20000

how long to expect service stop to take (ms)

errorColor

0

color to use on colorScript error (0-36)

errorAnim

5

animation on colorScript error (0-9)

While the service is running, changes to this configuration file will be automatically loaded the next time the script checks its messages (within 2 seconds by default). If you leave the service configured as shown, it will run the ccnetWeb.pl script every 30 seconds.

Web Orbs

In my environment, we have three orbs and only two HDKs. The service is installed on both hosts with HDKs attached, but that leaves one orb out of the loop. To update it, one of the servers is also configured to update the orb using its webOrbs configuration parameter. This orb is updated using Ambient's Web Developer API.

Other uses

This service was written to make it easy to monitor anything using an Ambient Orb. With a different color script and polling interval, you could make it monitor just about anything. During testing I had it monitor hockey scores, crude oil prices, and network traffic (not all at the same time). If you do something like that, I'd like to hear about it, so please let me know.

Ambient Orb Setup

This page describes the process of hooking an Ambient Orb up to show a real-time information using the Ambient Hardware Developer's Kit.

Previous Work

The Orb provides a great, at-a-glance indication of build status for a continuously integrated software project. The subjects of Continuous Integration and its benefits are discussed in a number of other places, so I won't cover them here. Likewise, the use of an Orb using the Ambient Web API is covered admirably by Michael Swanson, so you can read that there.

Problems

The two problems I found were:

  1. Update lag

    The Ambient pager network does not change the color of an orb for 10 - 30 minutes. I can break a build in seconds. An ideal system would indicate the status of software builds in real time with no lag.

  2. Integration of multiple software projects

    I work in a shop that produces a lot of different projects at a time. We currently have eleven builds managed by CruiseControl.NET. Using NAnt events as described elsewhere did not provide an easy way to measure how many builds were successful moment-by-moment.

Solution

Lucky for me, the first problem can be solved with hardware. As a software guy, I love when that happens. Ambient produces a Hardware Developer's Kit. You put an Orb on one end and a serial port on the other, and you're in business: you can update the orb instantly to any color you like.

Unfortunately, the cable is only 3 feet long, making the orb's location a bit constrained. This was easily solved with a cheap 50-foot serial cable. As a bonus, the $45 (with shipping) HDK frees me from the $80/year subscription to Ambient's developer channel, so the hardware investment will pay for itself within the first year.

To have the Orb reflect the status of multiple software projects all at once, I polled the CruiseControl.NET server. For now, I'm using a screen scrape of the CruiseControl dashboard. With a little gumption, I could probably poll the same port that CCTray uses.

Keeping in mind that I might not always use CruiseControl as my CI solution, and that I might change the way I poll it for build status, I thought it would be nice to keep those changes insulated from the core orb updating service.

I'm a native speaker of Perl, so that's the language all of this is in. I used Win32::Daemon by Dave Roth to create a Windows service in Perl. The service talks on the serial port using Bill Birthisel's Win32::SerialPort package and updates the colors using my Win32::AmbientOrb package.

How to Do It Yourself

This Walkthrough describes how to set up the whole system.

Lazy Part 4

Part 4: Talking to Yahoo! Music Engine

So the remote has been programmed to impersonate a CD player remote, and the computer can detect when it's sending commands. Now I just need to actually do something with the commands.

Good News

When I installed Girder, I found out that it's already got a Yahoo! Music Engine plugin configured. It can handle Play, Pause, Stop, Skip, etc., so my initial goal of skipping Nickelback songs looks to be within easy reach. As a bonus, Girder also has plugins for WinAmp, Windows Media Player, and just about any other software you could be using to control your playlist.

To actually make use of Girder, you will need to visit each event in the included Yahoo! Music Engine GML and make usre it's listening for its events from the remote you just set up. Just visit the event you want to define: and double-click it to set its properties. When you get there, set the Event Device to the remote you just created:

Budget

After my initial investigation, I expected to spend just under $150 and 20 hours to get this done. I spent $143.44, so for once I was under budget. If you already have a universal remote that you like, you really could do this with just the UIRT and Girder ($103.60 with shipping). As far as time, there were two parts of this that went surprisingly smooth: Girder's YME plugin saved me hours of capturing commands, and the IrToWav software made it super easy to program the remote with exactly the right codes for all of my devices. I actually spent only 9 hours on this, and since I already found the parts and vendors, you could get through this exercise in even less time.

Next Steps

At this point, I have achieved my initial goal of being able to control my playlist using the same infrared remote I use for the rest of my stereo equipment. Along the way, some other interesting questions and challenges presented themselves. If I'm feeling particularly ambitious in the future I might plan to pursue one of these:

Changing Stations I might decide after skipping ten tracks in a row that maybe I'm just listening to the wrong station. It would be cool if I could set up a list of favorite channels or playlists and change to them with the remote.

RF Remote Control This setup works great in my living room where I'm already holding an infrared remote control (unless Blake has stolen it). But I have speakers on my back porch too and the IR remote doesn't really cope well with the sliding glass door. I live in Phoenix, so infrared opacity is important, and I'm not willing to change glass. An RF remote would solve this problem and free me from the line-of-sight requirement.

Breakeven Analysis

I know how much time and money I spent on this. I'm willing to ignore the money for now. A vanity website baron such as myself has little time for such material concerns anyway. The real scarce resource is time. I had my faithful assistant clock me while I made round trips to the computer and back to my seat skipping crappy music tracks. 13 seconds per trip, average. Then he clocked me using the remote: 2 seconds. That's a net time savings of 11 seconds per crappy music track.

I don't have data concerning the ratio of music I'll tolerate to music I won't, so we will work from a model. If each song is 3½ minutes long and 3% of them are crappy enough to be skipped, my 11 second advantage breaks down to .001571429 seconds saved per second that I listen to music, or about 5.7 seconds per hour. To look at it another way, I'll be hearing about 17 songs per hour, with a little more than one crappy song every two hours, but the song will only waste 2 seconds of my life, not 13.

If I listen to music for an average 30 minutes a day, it will only take me 191 listening days to break even on my 9 hour investment. I drove the golden spike uniting Yahoo! Music Engine and my remote on March 20, 2006. That means that on September 27, 2006, I will have regained all of the time spent putting this together. This is considerably more favorable than if it had taken 20 hours as I predicted at the beginning. That would have put my breakeven point at May 18, 2007. Still acceptable.

Summary in 10 Words or Less

Not as hard as I expected and totally worth it.

Final Budget: $143.44, 9 hours

Lazy Part 3

Part 3: Talking to the Computer

For my next trick, I'll need an assistant: the USB-UIRT. This is that gadget that's going to receive infrared signals from the remote. I'll also need the Girder software to learn the codes my remote is sending and actually do something with them. For now, I'm just going to be satisfied with proving that my PC is hearing what the remote is saying. Making the software do anything about it is a matter for another day.

I'll only be needing a handful of buttons here. They're all standard play controls and appear on just about any remote.

  • Power (to open or bring focus to the application)
  • Play/Pause
  • Stop
  • Previous Track
  • Next Track
  • Shuffle
  • Repeat

Hardware Installation

Dude. That couldn't have gone much easier. Plug in the UIRT and the Plug and Play dialog finds it. You download the drivers from the USBUIRT site and tell the PnP wizard where to find them. Done.

Software Installation

This was also a cakewalk. Come to think of it, it was much easier than a cakewalk. I've participated in several of those and never walked away with a thing. Here there is no cake, but at least I have something to show for my effort.

Telling Girder About It

Go to File -> Settings, select "Plug-in settings," and check the box next to "USB-UIRT." Restart Girder and you're off & running.

Setting Up Your Remote

Go to Tools -> Add Remote Wizard. Click Next, name the remote, then start programming. It asks you to press any button to make sure it detects a remote at all, then it asks you to press each button that you want to use on the remote. After you finish this, Girder will be able to get signals from your remote.

All of this only took me an hour, and most of that was poking around trying to figure out what else Girder could be used for. I went ahead and picked buttons to use for song rating too. If everything goes smooth, I'll not only be able to skip sucky tracks, but ban them for good measure. Next, I'm going to make Girder listen for the signals from my remote.

Budget update: $143.44, 8 hours.

Lazy Part 2

Part 2: Programming the Remote

I got the remote control in the mail today. It's a beautiful, silver OneForAll 8910.

Just to get things warmed up, I found the code for my TV and entered it. I got that up and running right away. Early win. Nice.

Uncharted Territory

I tried out the IR.exe and Remote Master software. It turns out there's one more handy piece of software, IrToWav. I'll explain that in a minute.

In brief, Remote Master creates the key mapping for the remote (which button should send what signal), IR.exe converts that map to a binary file the remote can understand, and IrToWav generates a .wav file that can load the upgrade to the remote.

How slick is that? The remote has a modem in it for one-way uploads of information. If you call OneForAll technical support, they can have you hold your remote up to the phone and load new devices and protocols. If you use IrToWav, you can do the same thing, but with a custom program you created. You don't even need the JP-1 cable to write to this remote.

There's a great tutorial on all of this on the hifi-remote site, and another good one here. The hifi-remote forums are also a gold mine of great information. If you just take two hours to read the sticky posts in the beginner forums and search for your particular remote, you'll be a beginner no longer.

To control the music player on my PC, I just selected a common universal code for a CD player (for some reason, code 0157 is used for 16 different CD players in my remote's catalog, but not for mine). I figure choosing a common code means there's a low probability that its carrier signal will be out of range for my IR receiver or some other nonsense. I plan to use these play controls to manipulate the Music Engine on my screen. I must say that this step of the process went smoother than I could have imagined. The remote is already controlling my whole home entertainment system (except PC), and I had a super-easy graphical interface to remap all of the buttons.

I didn't need the $14 JP-1 Cable to do this, but since I already ordered it, I'm adding it to the budget. I'll use it later when I'm in a nerdy mood.

Budget update: $39.84, 7 hours

A Different Kind of Lazy

All is not as it should be with the world. When I'm on my sofa listening to Launchcast, I'm subjected to Nickelback songs. That's no way to live, and I'm willing to go to the very gates of hell and back to avoid walking 15 feet to hit the "Skip" button every time it happens.

The problem

Back when you had a TV that looked like this:

if you didn't like what was on, you just had to wait it out or get up. Wiser minds than mine realized early that this situation was untennable.

In June of 1956, the first consumer wireless remote control entered the home. It may be just coincidence that this came two months after As the World Turns was introduced on CBS.

Fastforward 50 years.

Now, an increasing amount of my entertainment content comes from my PC, not an audio component sitting with my television. When I'm listening to Yahoo Music Engine and their Launchcast station tries to pawn some Nickelback off on me, I have to get up and skip the track by hand.

This shall not stand.

My Goal

I'm going to use the same infrared remote control I use for my home entertainment system to interact with the Yahoo Music Engine on my PC. It won't be easy, and the fact is, I'll spend more time putting this system together than I would have spent walking over to the computer to skip Nickelback songs over the next year.

If you don't get why I would do this, stop reading here because it's not going to get any better.

Along the way I'll keep track of how much time and money I'm spending to get this done. At the end, I'll have a parts list and step-by-step plans to make this dream a reality in your own home.

The parts list so far

  • USB-UIRT with shipping, $53.61 from Promixis This is the hardware that is going to receive infrared signals from the remote and set events in motion.
  • Girder 4, $49.99 from Promixis This is the Windows automation software that's going to listen for the remote and take all the right actions. I have never worked with it before, so I don't know what techniques will be available for interacting with the target application. There seems to be some support in there for locating windows by title and such (maybe I can just wire it up to automatically press the "Skip" button if "Nickelback" appears in the title bar), and if mouse spoofing doesn't pan out, YME has a developer API that might be useful. We'll see.
  • One for All URC 8910 Universal Remote Control and 4 AAA batteries, $25.85 from Amazon (optional) This will command my whole array of audio/video equipment, as well as the PC. If you have any universal remote, it will work. I got this one because my old "universal" remote couldn't control my DVD player, but this one's got that sweet JP-1 port so I can program it with custom codes. Now there's no such thing as an infrared device I can't control.
  • JP-1 Cable 13.99 from DIY Gadget (optional) This is used to program the remote control. I could get by without this if I used the built-in (and super cool) modem updater, but... it's a gadget. Besides, if $14 is going to break the bank, maybe you should consider another hobby.
  • IR.exe free download from Hi-Fi Remote (optional) This will be used to write data to the remote over the JP-1 cable. You can skip this if you're not going to be buying the JP-1 cable or getting that picky about your key mapping.
  • Remote Master free download from Hi-Fi Remote (optional) This works in conjunction with IR.exe and provides a graphical interface to remap keys on the remote. Naturally, you can skip this part if you're going to skip the previous two items.
  • IrToWav free download from Hi-Fi Remote (optional) This can program an equipped OneForAll remote (like mine) without the JP-1 cable. I'm still going with the JP-1 cable because I want to be able to read programs from the remote as well as write them.

Cost

I expect to spend a little less than $150 (including shipping). I have spent 5 hours finding options and selecting all of these purchases. I expect I'll spend about 20 hours by the time this is over. I will add items to the total expenses as they arrive.

Budget update: $0.00, 5 hours